Kubernetes supports several authorization methods, but the best-known and one of the most versatile is RBAC. Role-based access control implements a mechanism for restricting and controlling user access to resources of a system by using roles attached to users.
Implementing role-based access rather than profile-based access allows you to share these roles with multiple users, distributing the permissions across the cluster, which solves the problem of everyone having the same degree of access in all namespaces.
In this article, you will learn more about RBAC and how best to implement for your Kubernetes projects.
Role-based access control (RBAC) is a model of granular access. In the Kubernetes context, it is a way to restrict access to Kubernetes resources according to roles assigned to the users within a cluster. You can use the Kubernetes API to dynamically configure cluster-wide RBAC authorization policies with the rbac.authorization.k8s.io API group.
RBAC works by limiting access to cluster resources through four Kubernetes resources: Roles, RoleBindings, ClusterRoles, and ClusterRoleBindings.
The basis of all RBAC access policies is a native object called a Role. Roles are a set of rules that define access to resources and can be applied to multiple users.
ClusterRoles are access rules for one or more resources; however, while the Role object is limited to its own namespace, the ClusterRole is applied to the entire cluster regardless of the namespace. Roles need to be set in a particular namespace when you create them, while ClusterRoles do not need a namespace because they are above this separation.
Roles and ClusterRoles are permission definitions. These definitions need to be applied to users through other “sister” objects called RoleBindings and ClusterRoleBindings.
Bindings allow you to configure access for both individual subjects and user groups, granting these entities permissions defined on Roles and ClusterRoles. In addition, you can also guarantee access to a ServiceAccount.
The differences between the two are basically the same as for Role and ClusterRole. A RoleBinding can be applied to either a Role or a ClusterRole— although when done this way, it will only apply the ClusterRole rules to the namespace to which that RoleBinding belongs — while a ClusterRoleBinding can only be applied to a ClusterRole.
All bindings need a reference to an existing Role or ClusterRole. RoleBindings can only reference Roles, while ClusterRoleBindings can reference any ClusterRoles. This post will focus on securing the Kubernetes API. You’ll also want to make sure you have appropriate access controls when accessing the underlying Kubernetes nodes.
There are multiple ways you can make use of RBAC in your Kubernetes projects.
Most clusters come with RBAC enabled by default. You can also start a new kube-apiserver with the flag -authorization-mode=RBAC if you’re using manual clusters. If you’re using Azure, you can enable RBAC on an AKS cluster directly from the portal.
To use RBAC in Kubernetes, you’ll first need to create a user. For that, you’ll use an X509 certificate. Why a certificate instead of JWT tokens? JWT tokens are for external services or users who are temporary, whereas certificate authentication is preferred for internal services. This certificate is signed by the cluster CA and allows the user to authenticate to the API using this validation; in other words, Kubernetes verifies that the request is authenticated with the certificate’s key. If yes, it is a trusted user since only the cluster can issue such a certificate.
In order to create a certificate, you will first have to create a key and a certificate signing request (CSR). To do this, you need to create a directory inside your pod to hold the certificates. Below we’ll show you how to create a client certificate when using minikube.
The next step will be to create a key inside your directory using OpenSSL and CSR. Once you have the key and crt, you can create a user using the certificate.

Move the .csr and .key to the minikube directory:

The final step involves generating the certificate, which will be valid for five hundred days (you have to renew it after that).

Kubernetes offers various ways to create users, including setting up a user input in kubeconfig and setting up a context entry, which you can do using the commands below:

To determine whether the user was successfully added to kubeconfig, you can use the command kubectl config view.
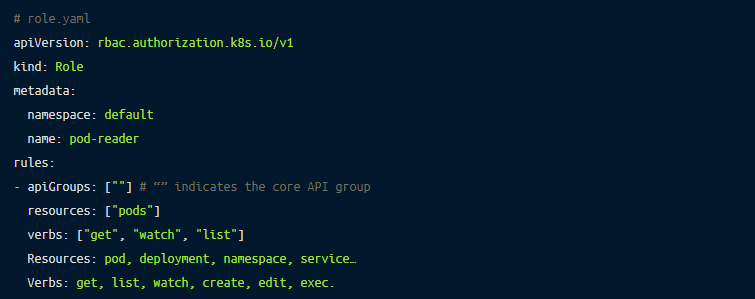
The next step is to create a role object, we’ll create a new yaml file called role.yaml. This will define what resources can be accessed and what operations can be used.

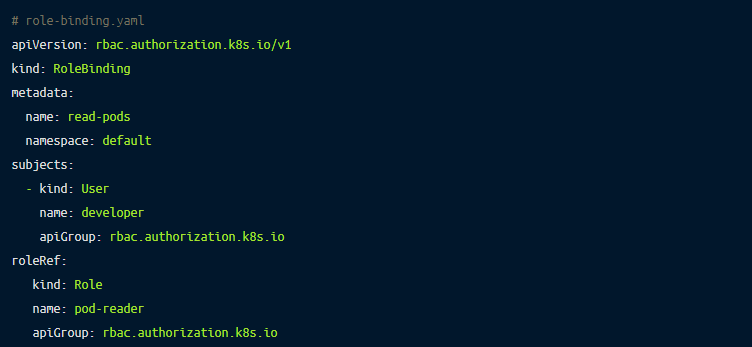
You need to match the developer user with the previously created role named pod-reader. To do that, you need to create a RoleBinding by declaring it in a yaml file called role-binding.yaml.

Next, you must apply role.yaml and role-binding.yaml in Kubernetes:

Since Kubernetes permissions are additive, you can apply multiple roles to a user. After creating the role and Role Binding, create a new user and apply the role to the user. After the user is created, you can use the kubectl command line tool to access the pods. kubectl auth can-i will show you the permissions of the user.

You have learned the basics of how to implement RBAC in Kubernetes, but for this method to be effective, you should follow industry best practices. These include the following:
There are certain challenges that you need to watch out for to ensure the success of your RBAC strategy:
RBAC is a useful solution to grant access rights depending on user roles, which helps in the effective management of resources within a cluster in Kubernetes. A clearly developed RBAC strategy can also help with security and compliance issues.
However, remember that RBAC loses its effectiveness if you don’t implement a proper strategy for creating and updating roles. If you follow the above best practices and regularly review the set roles in your organization, your RBAC strategy will be better positioned for success. If you’re using a cloud provider, they’ll often provide out-of-box RBAC recommendations. For AWS EKS review their documentation or the Kubernetes documentation if running Kubernetes yourself.
If you want to protect your apps hosted in Kubernetes, we recommend checking out Remoteler Kubernetes Access.