Many databases were born over 25 years ago, back in the unadulterated times of LAN parties and IRC. SSL was just for banks and sending unencrypted database traffic accounts was just how you did things. When databases use unencrypted connections, it means someone with access to the network could watch all and inspect all database traffic.
Turning on encryption makes the data unreadable, strengthening the connection, as in a zero trust network we assume it’s already been compromised. By default, MySQL is configured to only allow connections from the local system. If you want to connect to a MySQL server from a remote system, it is recommended to secure it with SSL/TLS. You should even assume the possibility that the database host could be compromised and always encrypt all database traffic.
Securing a database is relatively easy, and requires just a few extra steps that we’ve outlined below. For this blog post, I’ve focused on MySQL Community Server , which is using the MySQL Enterprise Server, I would recommend checking out this great guide on secure deployment for MySQL.
There a lot of tutorial available online, but many of them are outdated and don’t cover the secure defaults in MySQL 8. This post will cover the basics of securing a MySQL database with TLS using MySql 8 and Ubuntu 22.04.
For the first part of this post, we’ll need to install the MySQL Community Server and setup self-signed certificates for TLS.
We’ll start by installing MySQL, while it’s available via https://dev.mysql.com/downloads/mysql/, but we’ll use apt to install mysql.

Before we can start securing the database, we’ll use mysql_secure_installation to configure the database with the best practices for securing a MySQL database.
Note: We don’t recommend using the VALIDATE PASSWORD COMPONENT as later on we’ll be using Certificates based authentication later and this component doesn’t take this into consideration. We highly recommend using a long random password for the root user.
| OPTION | CHOICE | DESCRIPTION |
|---|---|---|
| VALIDATE PASSWORD COMPONENT | ⚠️ | Requires a strong password for all users. |
| Remove anonymous users? | ✅ | By default, a MySQL installation has an anonymous user, allowing anyone to log into MySQL without having to have a user account created for them. This is intended only for testing, and to make the installation go a bit smoother. You should remove them before moving into a production environment. |
| Disallow root login remotely? | ✅ | Normally, root should only be allowed to connect from localhost. This ensures that someone cannot guess at the root password from the network. |
| Remove test database and access to it? | ✅ | By default, MySQL comes with a database named ‘test’ that anyone can access. This is also intended only for testing, and should be removed before moving into a production environment. |
| Reload privilege tables now? | ✅ | Reloading the privilege tables will ensure that all changes made so far will take effect immediately. |
Next we’ll create a new dedicated user. The example below creates a new super-user with a password and access to all tables. This isn’t recommended, instead it’s best to create a limited accounts with the principle of least privilege. The MySQL Documentation provides good outlines for creating accounts.

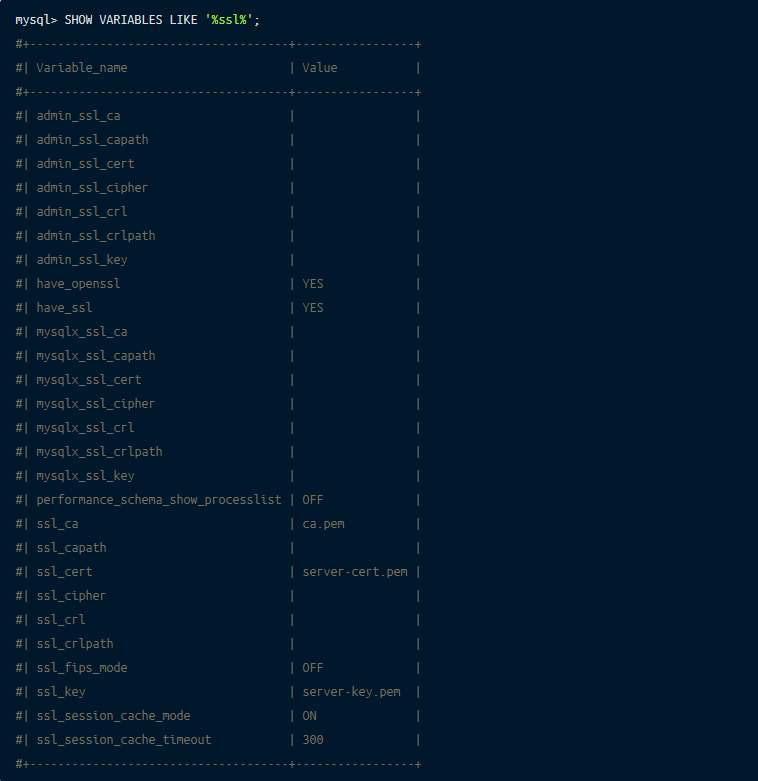
At this point MySQL is up and running. The next step is to review the current SSL/TLS Setup. Using SHOW VARIABLES LIKE '%ssl%'; highlights that the current ssl certificate configuration is using three self signed certificates ca.pem, server-cert.pem, server-key.pem.

MySQLs will use self-signed certificate when starting. You can use OpenSSL to view the details, note that it’s valid for 10 years and the Common Name (CN) is MySQL_Server_8.0.29_Auto_Generated_CA_Certificate

Even with the self-signed certificates the default MySQL connect isn’t secure. To connect using SSL/TLS you’ll need to add --ssl-mode to the MySQL Login mysql -u root -p --ssl-mode=required.
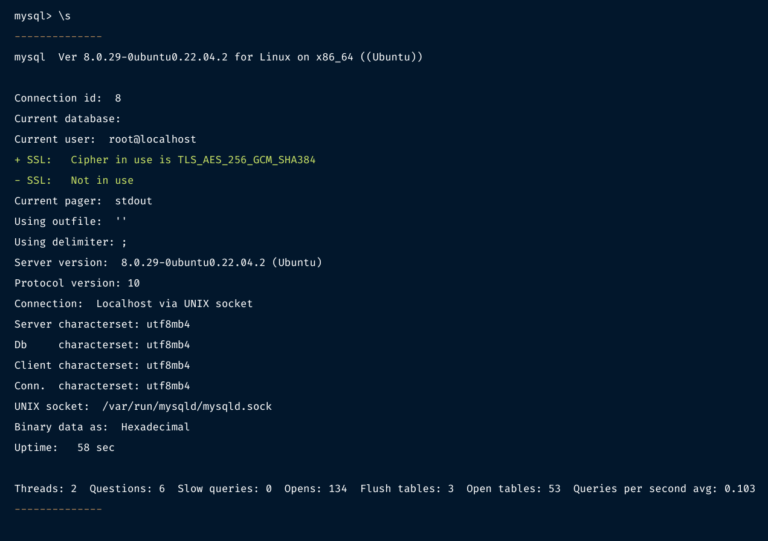
To confirm that the connection is using SSL/TLS verify with s.

mysql_ssl_rsa_setupMySQL 8 will automatically create self-signed certificates for you. If using an earlier version of MySQL you might need to create your own certificate. This can be done using mysql_ssl_rsa_setup

By default, MySQL does not allow login from a remote host and allows an unsecured connection. t configure MySQL to allow connection and accept only secure connections.
6.1 Create new remote user.

As of MySQL 8.0.23, a host value specified as an IPv4 address can be written using CIDR notation, such as 198.51.100.44/24.
6.2 Allow remote connections
Edit and Add the following lines:

Then restart MySQL.
6.3 Restrict remote connections
Using firewalls If you wish to allow remote access to port 3306, make sure to restrict source IP (IP or host from which clients connect) as much as possible. Below is an example of allowing TCP network access to port 3306 only if the connection originates from source CLIENT_IP.

6.4 Test remote SSL connections
Next, we’ll export the self-signed CA to the client. Export the ca.pem from /var/lib/mysql/ca.pem.
MySQL client encrypted connection configuration is similar to server configuration. It requires a CA cert (Certificate authority used to issue server certificate and client certificate) and client certificate-private key pair. You can use --ssl-mode={option} with option being
mysql_ssl_rsa_setup) to enable mandatory encrypted connection with additional verification of certificate authority or hostname.Connect using exported CA.
NOTE: Host name identity verification with VERIFY_IDENTITY does not work with self-signed certificates that are created automatically by the server or manually using mysql_ssl_rsa_setup.
One problem of using mysql_ssl_rsa_setup and mysql default self-signed certificate is that the server hostname is not verified. This means while the connection is encrypted, the server hostname is not verified. Opening the possibility for MITM attacks for another database using self-signed certs.
To fix this issue on you’ll need to issue certificates from a central certificate authority (CA). Depending on where you’re hosted you have a few options. For AWS users,